Wednesday, September 26, 2012

The Kitchen 1


I have started on the kitchen. We decided to do the kitchen in segments, because it seems much less daunting  that way. I started with the sections around the stove. 
Here are  the cabinets with the doors removed.   I forgot to take a picture before  I took them down :) . See the yucky yellow paint inside? UGLY.  When we moved in , I had put shelf liner paper all over everything, but it has been there for two years. It got gross, so I have decided to paint the insides of the cabinets screaming  bright white.  That should clean things up  and help us to more easily see inside the cabinets. 


Here is a close up of the back of the cabinets before. 


I didn't really want to paint the insides of the cabinets as that is a ton of work, but once we really looked at them and realized how insanely ugly they are, I realized I had to paint them. 

Here are the cabinets on the other side of the kitchen, so you can see what the cabinet doors look like. 


Here is what the lower cabinets looked like- this is after scrubbing! After I took this picture, I took off the doors, and I sanded the whole thing.   


The insides of the cabinets will be painted 4 times-  2 coats of primer and 2 coats of white interior semi gloss.  The shelves will also get  a coat of Miniwax Polycrylic for extra durability. 


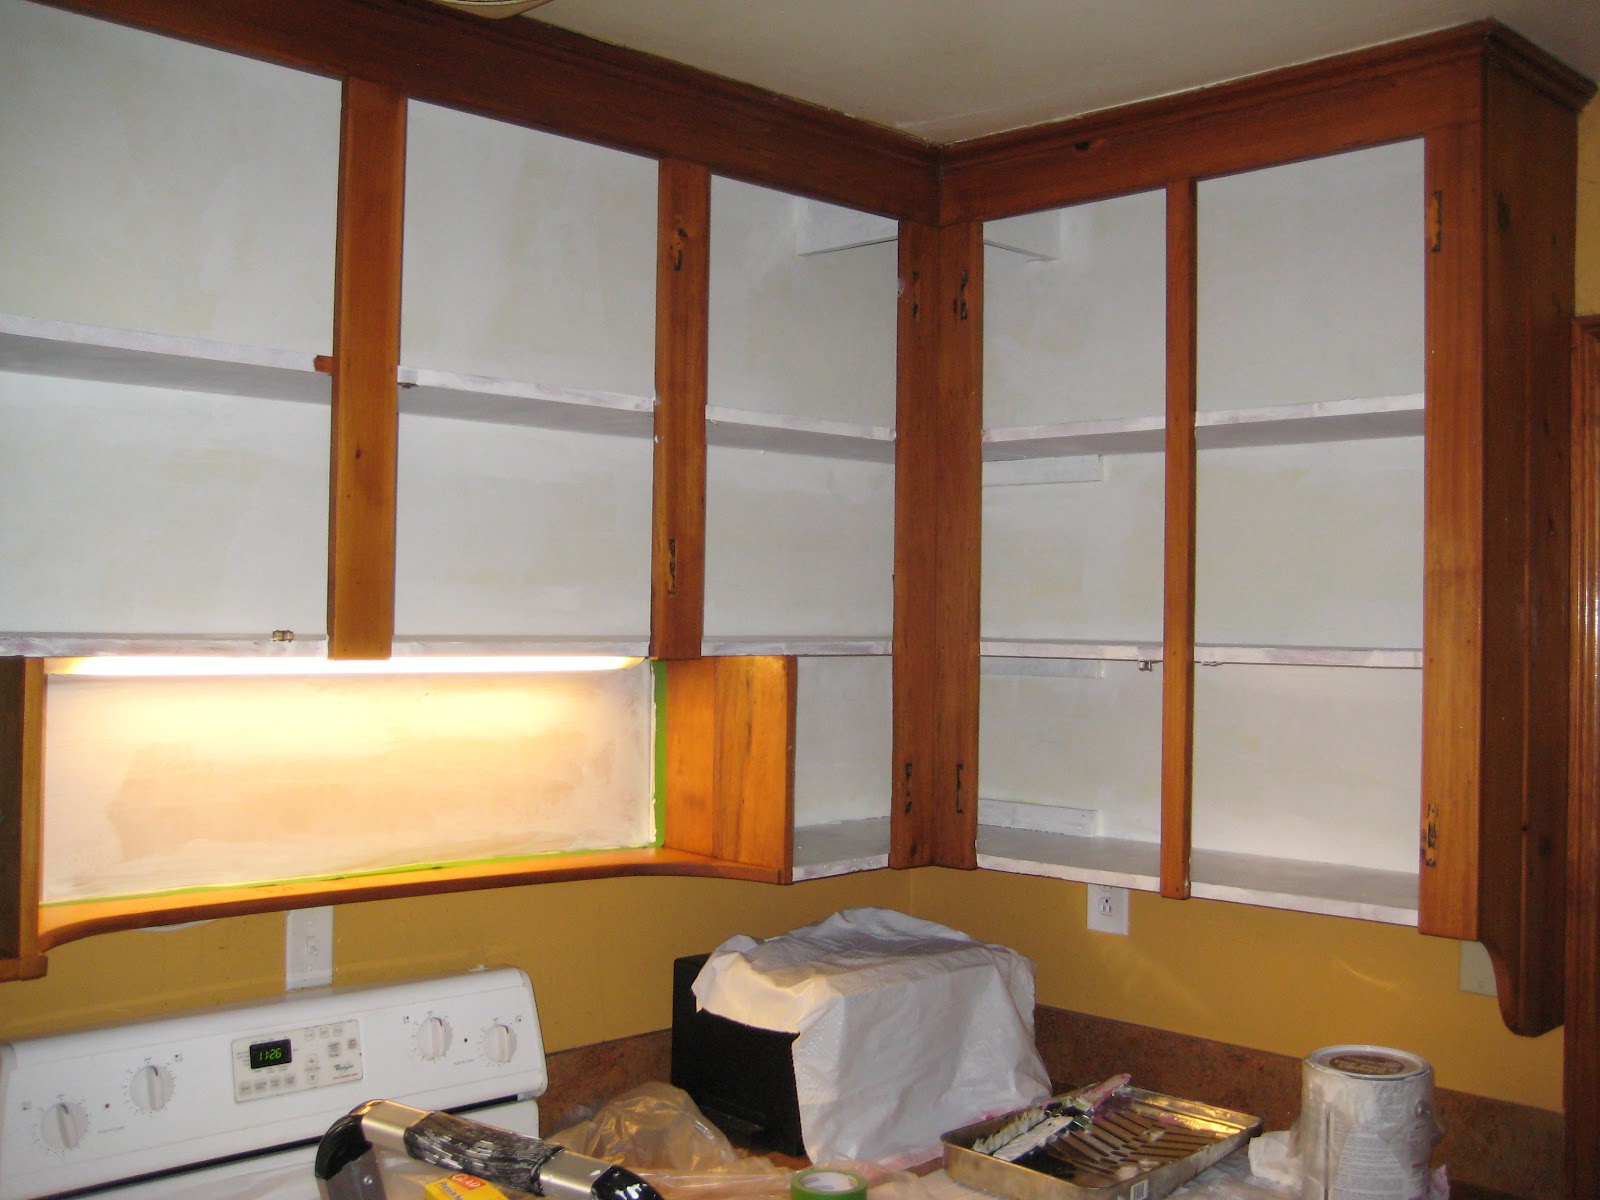
Here is the first coat of primer. Oh the difference!!! 


Then the first coat of stain!!! Ermergerd look at this!!! 


 This is the area above the sink before staining. 

 Here is the sink area with the first coat of stain. Applying the stain on the window was a pain. All the little corners were really hard to get to while standing with one foot on the counter and one foot on the ladder. 

 My hubby suggested using one of his head lamps   while painting, as I had mentioned it was kinda hard to see up in the corners of the cabinets.  I wore one for a while, then went and found the other one so I could have two on. Two was perfect! I had them kinda facing diagonally so the light overlapped in the  middle...  Yep. I'm a nerd. :) 


So far,  I have painted two coats of primer and  two coats of semi gloss on the inside of the cabinets.  Tomorrow, I will apply the Polycrilic, let that dry  for two days then  the insides of the cabinets are done. We can move stuff back in! All of our cabinet food/spice/sauces  are in totes and boxes in the dining room. 
There are two coats of stain on the outer cabinets and above the sink.  The stain needs to dry for five days, then I will coat them with two coats of  the sealant/ top coat.   In the meantime, I will be working on the doors. I am going to lightly sand them, wash them and then stain them.  My problem right now is finding space to lay them all out after staining. My spare room is full of furniture drying awaiting top coat!  
We are reusing the hardware that was on the cabinets, they are all in good condition. But they were nasty- I scrubbed all of them with a scrubbie and Dawn and the amount of gook that came off them was amazing!  After cleaning them, they look a little blah so  I am going to give them a coat of Rustoleeum Primer and then a Glossy black spray paint.  I think they will look fantastic!


Sunday, September 23, 2012

Honey to Espresso Day 3

I applied the third coat today of stain today.   They look amazing!

I turned the barstool and rocking chair over for this coat  and found all kinds of places I had missed on the first two coats.  So I might sneak into the spare room right before bed and just do a couple of extra touch up spots on those areas . As I did these at 9 am , they should be dry enough by 9pm to do that. Then I wait for 5 days! EH! 

The coverage is now very even. There are some places where the lighter wood peeks through on some tiny streaks but it looks very natural, I like it. 
Argh!!!!! Must now wait 5 days to put on top coat. This is going to kill me. 


The rocking chair looks pretty sweet. I am imagining a black velvet chair pad for it.... maybe. :) 


 This is a kinda blurry photo but it was the best one of the bunch that showed the color. The other photos make the stain look like milk chocolate frosting but  the actual color of the furniture is a dark chocolate.

I am so excited now to do this to my entire house! 


Honey to Espresso Links to days:

Honey to Espresso Day 1
Honey to Espresso Day 2

Saturday, September 22, 2012

Honey to Espresso Day 2


Day 2 Second coat 

Mmmmmm look at these guys. The second coat of stain has been applied. How pretty!  Much less streaky, much more solid coverage. They are so yummy looking! 


Here is the top of the coffee table up close.   


 The caning on the rocking chair was a royal pain to stain. I did break out a paintbrush and I had to really smash  the bristles into the caning to try to get in all the little nooks and crannies. I don't feel like I did a great job at getting them all but I am going to make a cushion for the chair and that will cover up those areas. 


 Applying the stain to all three pieces only took about  30 minutes.

Tomorrow is the final layer of stain!

Honey to Espresso
Links to Days:
 Honey to Espresso      Day 1 

Friday, September 21, 2012

Honey to Espresso Day 1

 I saw this thing on Pinterest....  change  your cabinets  from that orangey honey oak  color to espresso.  Oh yea. I clicked through to the link, read it and started scheming. Here was the answer to my  ugly kitchen and all my free mismatched  furniture. It looked very easy and pretty cheap.   There was a nice, well written, clear as day tutorial on the website.  

Here is the picture I saw and the link to the blog
Espresso-Cabinets


In our kitchen we have  pine  cabinets that are original to the home. They ugly. They old. But a new kitchen is down the list on things to spend money on.  We need a roof first. Then maybe I can think about a kitchen. But I can't take this kitchen any more. It is dingy and orange and  ugly and  blah. Something has to be done. This method using the Gel Stain would let me keep  our old cabinets and just update them from that orange pine color to a dark wood. My hubby doesn't want me to paint the cabinets. So the stain would pass his ok, as you still can sorta see the wood.

I didn't want to attack the whole kitchen without trying it out on something first. So I thought I would try the coffee table. Here it is:


Except for the color, it is an awesome coffee table. It was free, given to us many years ago from a co-worker who was moving.  It is sturdy as hell therefore can stand up to lots of family  daily use and  abuse.  It has three large baskets that go in it  that are wonderful for storing embroidery projects and crayons and such. It is a great table it is just that orange  honey pine color that I don't like. The rest of the wood in the den is dark and this sticks out as as freebie.


I made a plan. Monica says to apply  a layer, wait 12 hrs, apply  a layer, wait 24 hrs, apply last layer wait 5 days. Then apply topcoat.

Here is my plan:

Day 1  clean, sand, first layer
Day 2  apply second layer
Day 3  apply third layer
Day 4,5,6,7,8 try not to touch  them as they dry. This will be the hardest part. Just waiting.
Day 9   apply top coat
Day 10 apply topcoat
Day 11 apply topcoat, just on the table top  for extra durability. I think the chair and barstool will be fine with 2 coats.
Day 12,13 let them sit and dry.


This project will take 13 days start to finish   The can of stain and top coat were $29. 13 days  and  $29 for new furniture that doesn't look like furniture we got because someone was  moving? Awesome.

  I followed the tutorial exactly. I found the General Finishes Gel Stain at Woodcraft in Norfolk.  I cleaned the table  with a super hot kitchen scrubbie and  wood soap to get our life off the top. Snacks, glue, some paint, marker, hummus...   I lightly sanded, wiped then sanded again, wiped. I found a sock of Joey's that had a hole in it.  I got rubber gloves on to protect my hands. I turned up Lily Allan waaaaaay loud!

Day 1  First coat
Here is the stain in the can. It looks like dark chocolate pudding. It really looks yummy.  It doesn't smell bad. One a scale of 1 to 10, 1 having no smell and 10 being oil based primer smell- it is a 3.

 Here is the can and example of the color stain on bare wood on their website. 


I dipped my sock hand in the stain and started applying. I tried to wipe it on in the direction of the grain.
Here  is the table with some of the fist layer on. At this point, I freaked out liking it so much. My husband called and I was just babbling about how much I loved it already.  Which is a good sign on any project- when you love it and it isn't even finished yet, it is going to be awesome!!!

Hey! There is a hand in that sock!


 This is the table with the first coat on. I love it. I love it. I love it.


After putting one coat on the coffee table  I looked around the house for other things to apply stain to! This was just too easy and too fun! 
I chose this rocking chair. It is old and blah too. It could use some sprucing up. It was also free, given  to me by my uncle  when I was pregnant with E.   


 I also found a light wood bar stool given to us  by Joanna when her family moved to Washington state
 ( Come back, Joanna and bring your sweet kids with ya!! ) I forgot to take a picture of it, but it was your basic light wood.

Here are all three with the first coat of stain on. Monica on the blog says it will be streaky and ugly and odd.  Don't freak out, she says - go have tequila. Yes, my table is streaky. But I didnt freak out. I don't have any tequila in the house but I do have wine so  I had some wine. Yum.

About the gel stain:   This is technically a wood stain but using this way it is more like thin paint. This is really painting the stain on with a sock.  You rub  on a super thin layer with the sock and leave it and don't wipe it off. It dries very thinly, almost see through. The next layer the same. 


With this experiment,  I had three different wood finishes I was covering up. The bar stool was very slick and shiny- still had tons of clear finish on it. The coffee table was beat all to hell.  Knicks and gashes galore. The rocking chair was just old. Dry and old.  The stain went on all three the same, very smooth and very easy.

The cleaning ,sanding and staining  only took 1 1/2 hours.
Day one down- 12 more to go! :)
I am excited to stain again tomorrow!!!